WISDOMBYDATA
  • BLOG
    • Blog Guide
    • Blog History
  • EXCEL
    • Functions & Formulas
    • VBA & Macros
    • VLOOKUP
    • Pivot Tables
    • Conditional Formatting
    • Tricks & Shortcuts
  • BI
    • SAP BOBJ/BW
    • Tableau
  • SQL
  • ABOUT
    • About WBD
    • About Me

Creating Views Using the Graphical Explorer

2/17/2014

0 Comments

 
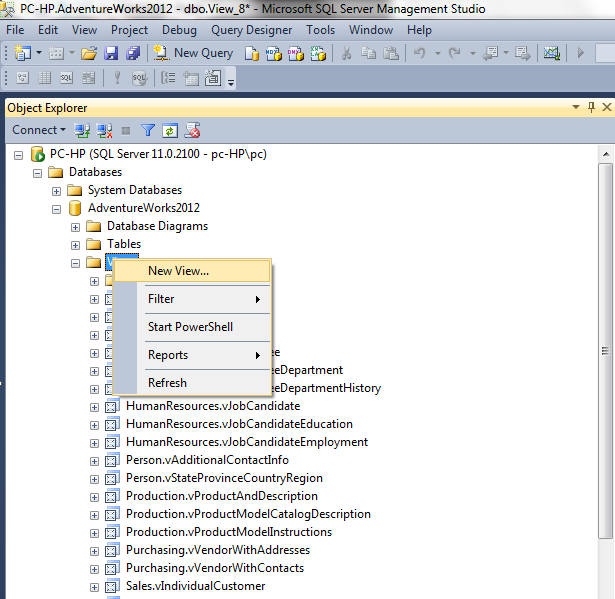
On my previous blog post, I demonstrated how to use an SQL statement to create a view. On this post, I want to show how to create a view using the graphical Explorer feature of SQL server. The first step is to open Object Explorer from under View.
Picture
Expand the Databases folder and then expand Adventure works until you can see the view folder. Right click on the view folder and click on "New View"
Picture
Select the tables that you want to use in your view. In this example I will use the highlighted tebles in the screenshot below.
Picture
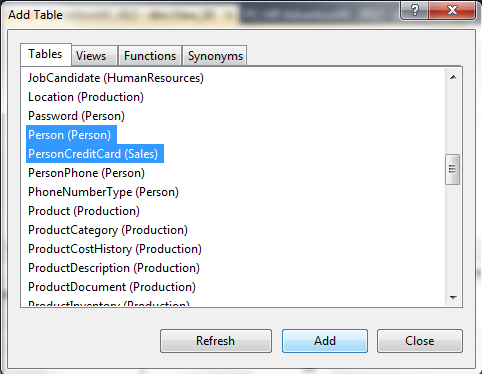
Push the Add button and you will arrive at a screen similar to the one below.
Picture
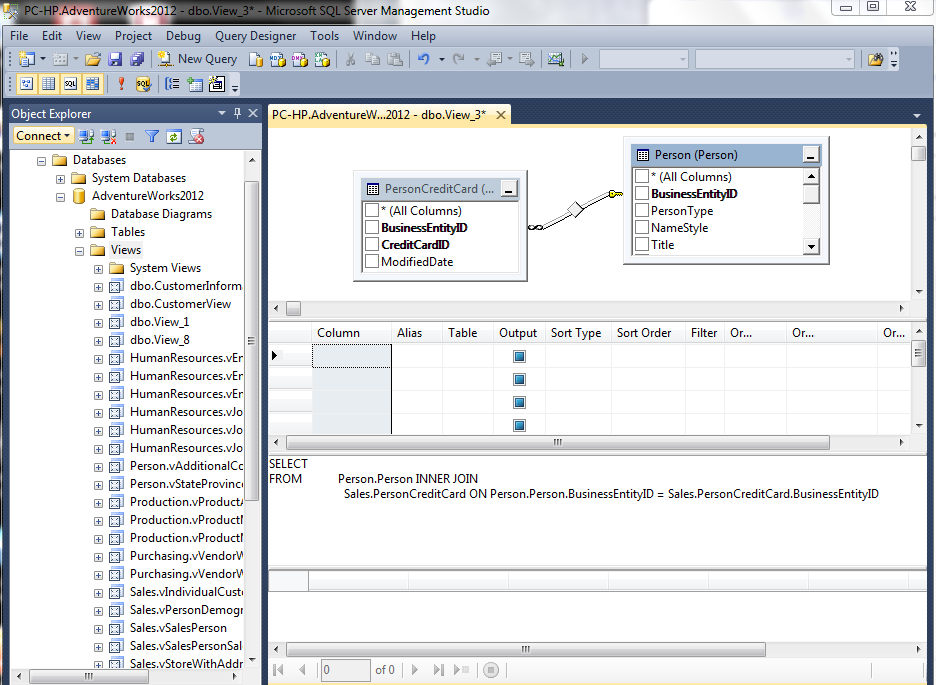
The screen below is made up of four panes:
1) The top pane, which is called the canvas pane, shows our two tables and their relationship. 
2) The second pane from the top shows the information about columns in the two tables. This is where we must select the columns which we want to be used in the view. Column aliases could also be added especially if the two tables have columns which share the same name (See the screenshot below and how I selected aliases for the Modified Date).
3) The third pane shows information about the select statement. This statement has ben automatically generated and could also be altered manually if needed. This SQL statement could be further modified if need (e.g. adding order by or filtering) 
4) The bottom pane is where the results of a select statement are displayed.
Picture
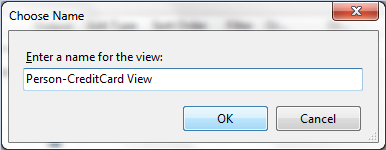
After existing the view Microsoft SQL Server asks if you want to save it. Puch Yes.
Picture
Select a name for the view and push OK. Note that this new view will not immediately appear under the view folder. The folder will need to be refreshed in order for it to appear.
Picture

0 Comments
<<Previous

    Categories

    All
    BI
    EXCEL
    MISC
    SQL

    Archives

    June 2020
    May 2020
    April 2020
    March 2020
    February 2020
    December 2019
    November 2019
    October 2019
    September 2019
    August 2019
    July 2019
    June 2019
    May 2019
    April 2019
    March 2019
    February 2019
    January 2019
    December 2018
    November 2018
    October 2018
    September 2018
    August 2018
    July 2018
    June 2018
    May 2018
    April 2018
    March 2018
    September 2017
    August 2017
    July 2017
    June 2017
    May 2017
    April 2017
    March 2017
    February 2017
    January 2017
    December 2016
    November 2016
    October 2016
    September 2016
    August 2016
    July 2016
    June 2016
    May 2016
    April 2016
    March 2016
    February 2016
    May 2015
    April 2015
    March 2015
    February 2015
    January 2015
    December 2014
    November 2014
    October 2014
    September 2014
    August 2014
    April 2014
    March 2014
    February 2014
    January 2014
    December 2013
    November 2013

Powered by Create your own unique website with customizable templates.
  • BLOG
    • Blog Guide
    • Blog History
  • EXCEL
    • Functions & Formulas
    • VBA & Macros
    • VLOOKUP
    • Pivot Tables
    • Conditional Formatting
    • Tricks & Shortcuts
  • BI
    • SAP BOBJ/BW
    • Tableau
  • SQL
  • ABOUT
    • About WBD
    • About Me